

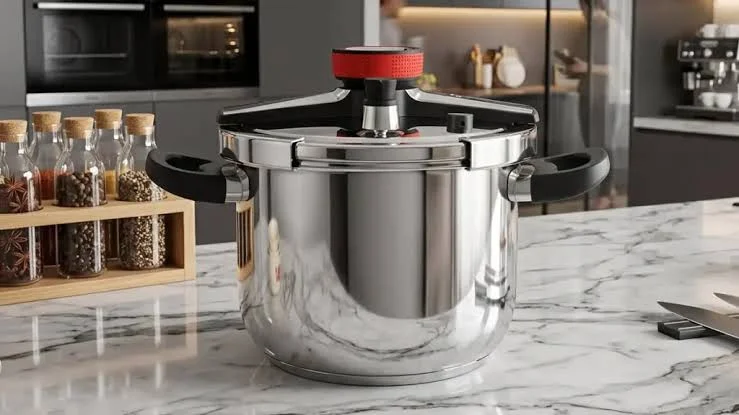
A pressure cooker can feel like an intimidating piece of kitchen equipment. For decades, home cooks traded cautionary tales about rattling metal pots and messy kitchen ceilings. Modern engineering has changed all of that. Today’s models feature fail-safe backup vents, automatic lid locks, and precision valves that make catastrophic failures practically impossible. When you master how to use a pressure cooker, you unlock one of the most efficient, nutrient-dense, and flavor-packed cooking methods available, cutting standard simmer times by up to 70 percent.
At its core, the science is simple. In an open pot, water turns to steam and escapes at 212°F (100°C). Inside a sealed chamber, trapped steam creates intense atmospheric pressure, raising the boiling point of liquid up to 250°F (121°C). That superheated moisture forces flavor deep into ingredients and breaks down tough collagen in meat within minutes instead of hours.
Here is everything you need to operate both stovetop and electric models with complete confidence.
1. Anatomy of a Pressure Cooker: 5 Parts You Must Know
Before learning how to use a pressure cooker, take a moment to look over your cooker’s hardware. Knowing what each component does turns an intimidating appliance into a predictable kitchen tool.
-
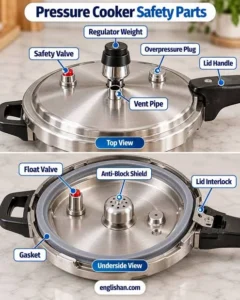
The Sealing Ring (Gasket): This flexible silicone or rubber ring sits inside the rim of the lid. It creates an airtight barrier that prevents steam from escaping around the edges.
-
The Pressure Regulator or Weight Valve: On a traditional stovetop unit, this is the weighted metal piece on top of the vent pipe that jiggles or hisses to vent excess steam. On electric pots, it is usually a toggle knob marked “Sealing” and “Venting”.
-
The Float Valve (Safety Pin): A small metal pin on the lid that rises when pressure builds inside the pot, mechanically locking the lid so you cannot open it while pressurized. It drops back down once the pot returns to atmospheric pressure.
-
The Anti-Block Shield: A small metal mesh cover mounted under the lid directly beneath the steam release pipe. It stops bits of food from flying upward and clogging the steam exhaust.
-
The Trivet or Steamer Basket: A stainless steel rack that rests on the bottom of the pot. It lifts delicate foods, whole chickens, or ramekins above the boiling liquid for pure steam cooking.
2. Stovetop vs. Electric Pressure Cookers: Key Differences
Understanding the difference between appliance styles is critical when learning how to use a pressure cooker. While both harness pressurized steam, they handle heat input and operational pressure differently.
A stovetop model sits directly on your gas, radiant, or induction burner. Most stainless steel stovetop units reach 15 psi (pounds per square inch). That higher pressure creates hotter internal temperatures, cooking food roughly 15 to 20 percent faster than electric countertop models. Stovetop units also brown meat more intensely during the initial sear and respond immediately when you change the burner heat.
Electric multi-cookers operate on internal heating elements governed by microprocessors. Most electric pressure cookers operate between 10 and 12 psi. While they cook slightly slower than stovetop pots, they offer automated convenience: set the time, walk away, and let the cooker switch to a warming cycle on its own.
| Feature | Stovetop Pressure Cooker | Electric Multi-Cooker |
| Operating Pressure | Up to 15 psi | Around 10 to 12 psi |
| Heat Control | Manual burner adjustments | Automated microprocessor |
| Cooking Speed | Fast due to higher psi | Moderately fast |
| Monitoring | Requires manual timing and heat tweaks | Set-and-forget programming |
| Best For | Deep searing, high heat, traditional recipes | Hands-off convenience, meal prep |
3. The 3 Golden Rules Before Turning on the Heat
Every kitchen success story starts with good prep habits. Keep these fundamental rules in mind whenever you use your cooker.
The Minimum Liquid Rule
A pressure cooker cannot build pressure without steam, and it cannot produce steam without thin liquid. Always add at least one cup of liquid (water, broth, or light stock) for a 6-quart stovetop cooker, or at least a half-cup to one cup for electric models. Thick liquids like pureed tomato sauce, cream soups, or gravies will burn against the base before enough steam develops.
Strict Fill Limits
Never fill your pressure cooker to the brim. Observe these two internal limits without exception:
-
The 2/3 Mark: For standard foods like meat, root vegetables, and stews, never fill the pot past two-thirds of its total volume.
-
The 1/2 Mark: For expanding foods that froth or swell such as beans, lentils, dried peas, rice, and whole grains, keep the pot half full or less. Froth can enter the vent pipe and block steam exhaust if the pot is overfilled.
The Gasket and Vent Inspection
Before locking the lid, take 30 seconds to inspect your equipment. Check that the silicone gasket is seated smoothly in its channel without twists, tears, or dried residue. Hold the lid up to the light and peek through the vent pipe to confirm the passage is completely clear of food particles.
4. The First-Time Water Test: Calibrate With Zero Risk
If you have never cooked with pressurized steam before, running a plain water test is the best way to get comfortable with the process. It lets you observe the steam, hear the sounds, and verify that the lid creates a complete seal without risking dinner.
Pour two cups of cold water into your pot. Seat the lid, rotate it into the locked position, and set the steam valve to the sealed setting. Turn your stove burner to high or select High Pressure for three minutes on an electric model.
As the water heats, you will see a gentle trail of steam escape from the valve. Soon, the float pin will pop upward, the gentle hissing will quiet down, and the pot will begin its timed cycle. Once the time finishes, practice your release methods. Performing this simple dry run eliminates first-time kitchen anxiety.
5. How to Use a Pressure Cooker: Step-by-Step Instructions
Follow this straightforward procedure from initial prep to serving. This universal sequence forms the foundation of how to use a pressure cooker for any recipe.
-
Brown Your Ingredients and Deglaze: Turn your burner to medium-high or press the sauté function on your electric unit. Add a splash of oil and brown your meats or aromatics for richer flavor. After searing, pour in a splash of liquid and use a wooden spoon to scrape up every brown bit stuck to the bottom. Skipping this step can trigger the burn sensor on electric pots.
-
Add Ingredients and Required Liquid: Add the remaining ingredients, making sure you have included enough thin cooking liquid. Keep the total contents below the proper fill line.
-
Seal the Lid Securely: Align the lid markings with the cooker body, set the lid flat, and twist it until it clicks into its locked position. Confirm that the pressure release valve points to “Sealing”.
-
Bring the Cooker Up to Pressure:
-
For stovetop models: Place the pot over high heat. Watch for the pressure indicator to rise or listen for the regulator weight to begin a steady, gentle rocking rhythm. Once that occurs, drop your burner to low or medium-low heat to maintain steady pressure without overheating.
-
For electric models: Select “Manual” or “Pressure Cook”, adjust the timer, and let the pot handle the rest.
-
-
Cook for the Specified Duration: Start your kitchen timer only after full pressure has been established, not when the heat first turns on.
-
Depressurize Safely: Turn off the burner or cancel the cooking program, then use the decompression technique appropriate for your dish before opening the lid.
6. Depressurizing: Natural vs. Quick vs. Cold-Water Release
Knowing how to release steam safely is just as important as knowing how to use a pressure cooker during the active cooking stage. There are three primary methods for returning the pot to normal pressure.
Natural Pressure Release (NPR)
Natural release occurs when you take the cooker off the heat source and let the ambient room temperature cool the pot on its own. As the interior cools, the steam condenses back into liquid and internal pressure drops. This process takes anywhere from 10 to 30 minutes depending on how full the pot is.
Use NPR for: Large cuts of meat like pot roast, bone broths, dried beans, chili, and starchy grains. A sudden drop in pressure causes meat juices to boil out rapidly, leaving the meat dry and stringy. Natural release lets proteins relax and retain moisture.
Quick Pressure Release (QPR)
Quick release requires you to manually shift the pressure valve from “Sealing” to “Venting” using a long wooden spoon or wearing an oven mitt. A focused jet of hot steam vents straight up into the air. Keep your hands, arms, and face well away from the nozzle path.
Use QPR for: Delicate foods that easily overcook, such as broccoli, green beans, tender seafood, or pasta. Quick release stops cooking immediately. If liquid or froth begins spitting through the vent, immediately flip the valve back to sealed, wait two minutes, and proceed in gentle bursts.
The Cold-Water Release (Stovetop Only)
This fast method applies strictly to traditional stovetop aluminum or stainless steel cookers. Carry the locked cooker to your sink and run cold tap water over the lid, taking care not to let running water hit the steam vent directly. The cold water causes immediate internal condensation, dropping the float valve in under a minute.
Caution: Never use this technique on electric pressure cookers, and avoid it on modern spring-valve stovetop cookers unless the manufacturer manual explicitly permits it, as rapid thermal shock can warp metal components.

7. The Recipe Conversion Formula: Adapting Everyday Meals
Converting standard family recipes for the pressure cooker is simple once you understand the basic conversion math. Sealed cooking changes two major variables: time and moisture loss.
Because zero liquid evaporates during pressurized cooking, reduce the standard cooking liquid called for in braises and stews by roughly 25 to 50 percent. Use just enough broth or water to cover the bottom of your ingredients and generate steam.
For cooking time, cut conventional braising or simmering times down to about one-third. A pot roast that normally requires three hours in a 325°F oven will achieve tender results inside a pressure cooker in roughly 45 to 60 minutes.
8. Foods to Never Cook Under Pressure
While a pressure cooker handles everything from tough chuck roast to tender rice, certain ingredients should be kept out of the sealed pot.
-
Dairy Products: Heavy cream, sour cream, milk, and soft cheeses will curdle under intense heat and froth upward, which can clog exhaust tubes. Always stir dairy components in after depressurizing.
-
Thickening Starches: Never add flour, cornstarch slurries, or store-bought gravy thickeners to the pot before bringing it to pressure. Starches sink to the bottom, prevent clean convection currents, and scorch. Simmer your thickeners into the sauce with the lid off after cooking completes.
-
Breaded or Crispy Cuts: Pressure cooking is a wet steam environment. Breaded chicken cutlets or crispy pork chops will turn limp and soggy under pressure.
9. High-Altitude Adjustments: Cooking Above 2,000 Feet
Atmospheric pressure decreases as altitude increases. Because of this, water boils at lower temperatures the higher you live, which drops the internal temperature of your pressure cooker as well.
If you live at 2,000 feet above sea level or higher, increase your pressurized cooking time by 5 percent for every additional 1,000 feet of elevation. A stew that finishes in 20 minutes at sea level requires roughly 23 minutes at 5,000 feet. Making this adjustment prevents undercooked beans and tough meat cuts.
10. Troubleshooting Common Pressure Cooker Problems
Even experienced cooks run into minor issues occasionally. Here is how to correct common errors quickly.
-
Steam is Leaking From the Edge of the Lid: The sealing ring is either misplaced, twisted, or dirty. Depressurize the cooker, remove the lid, let the gasket cool, and wipe down both the rim and silicone ring before reseating it.
-
The Float Valve Pin Refuses to Pop Up: Check that your valve is toggled fully to “Sealing”. If steam continues escaping around the pin without lifting it, the heat may be set too low, or you may not have enough thin liquid inside to produce sufficient steam volume.
-
The Electric Cooker Triggers a “Burn” Notice: This warning indicates that food is scorched onto the bottom of the pot. Release pressure, unlock the lid, transfer the contents to a bowl, and scrape the burnt crust completely off the inner liner. Stir in a quarter cup of extra broth before latching the lid again.
-
The Lid Feels Stuck After Cooking: Never try to muscle a pressure cooker open. If the float valve is down but the lid resists turning, a minor vacuum has formed inside. Move the steam valve to venting to balance internal air pressure, and the lid will twist open smoothly.
11. Quick Reference Cooking Chart
| Ingredient | Preparation | Liquid Required | Cook Time (High Pressure) | Release Method |
| Chicken Breast | Boneless, whole | 1 cup broth | 8 to 10 minutes | Quick Release |
| Beef Chuck Roast | Cut into large pieces | 1.5 cups broth | 45 to 55 minutes | Natural Release |
| Dried Black Beans | Unsoaked | 3 cups water per cup beans | 25 to 30 minutes | Natural Release |
| Brown Rice | Rinsed | 1.25 cups water per cup rice | 20 to 22 minutes | Natural Release |
| Potatoes (Whole) | Medium, pierced | 1 cup water (on trivet) | 10 to 12 minutes | Quick Release |
12. Cleaning, Odor Control, and Long-Term Storage
Taking proper care of your cooker ensures it operates reliably for years to come. Hand wash your silicone gasket with mild dish soap after every use. Silicone easily absorbs volatile food odors from garlic, onions, and ground spices.
To refresh a smelly gasket, soak it in a shallow bowl filled with equal parts white vinegar and warm water for an hour, or steam two cups of water with a sliced lemon inside the sealed cooker for three minutes.
When storing your cooker in a cabinet, never lock the lid onto the pot. Storing the unit sealed traps lingering odors and compresses the silicone gasket, which can shorten its lifespan and weaken future seals. Simply flip the lid upside down and rest it loosely on top of the base.
Now that you know how to use a pressure cooker, start with a simple broth, a pot of pinto beans, or a basic chicken curry. Once you see how quickly and consistently pressurized steam works in your kitchen, this versatile tool will easily earn a permanent spot on your countertop.




Leave a Reply